

Here we are with another plastic canvas creation for dolls! This time it is the Plastic Canvas Fashion Doll Dressing Room by Kooler Design Studio.
I love the Annie’s Attic pattern I’ve been using but wanted to change things up a bit, so I chose this pattern to create a home for two very special dolls.
Of course, I changed all the colors and added my own little tweaks.
Before I get into customizing though, here is a look at the materials called for in this Dressing Room pattern versus what I ended up using:

Plastic Canvas Fashion Doll Dressing Room:
- (12) 3/4 sheets of stiff 7-mesh plastic canvas measuring 12″ by 18″. These are not the giant artist-sized sheets, but are larger than than the standard 10″ by 13″ plastic canvas sheets.
- 1/2 sheet of soft 7-mesh plastic canvas measuring 12″ by 18″.
- 2 pieces of flexible mirror cut to 2 3/8″ by 3 9/16″.
- 10 pink heart buttons.
- 2 inches of 3/4″ wide Velcro.
- Wooden dowel that is 10 3/4″ long and 1/8″ diameter.
- Tacky glue.
- Worsted weight yarn in the following colors: White, Light Pink, Dark Pink, Red, Yellow, Light Green, Medium Green, Purple, Tan, Brown, Black.
Changes I made to the list:
- 13 sheets of 7-count stiff 12″ by 18″ plastic canvas. (I always buy an extra sheet of plastic canvas in case I make a mistake while cutting).
- 1 sheet of pink 7-count plastic canvas (for the drawers).
- 1 sheet of yellow 7-count plastic canvas (for the drawers).
- Reflective scrapbook paper.
- Small pink and blue beads for knobs.
- Brown 1″ wide Velcro trimmed to 3/4″ wide.
- I omitted the dowel completely. The dowel is supposed to go on the left side of the case to hang your doll’s clothes; however, I want that space to hold a doll instead, so I left the dowel out.
- NO GLUE! Everything is stitched in place, except for the mirrors. The mirrors (reflective paper) are glued to a piece of plastic canvas.
- Worsted weight yarn in the colors of my choosing.
Here is the finished front of my trunk:

Anastasia and Drisella–two dolls from our set of live-action Cinderella doll set!
What you see here is the front of the trunk. The original Dressing Room pattern has Rome and Paris stitched on the front; however, I wanted pictures better suited for Anastasia and Drisella. I also wanted them to be cute; not ugly as the sisters are sometimes portrayed.
I found this pattern on Pinterest ( I think it’s another Perler bead pattern) and thought it looked nice, so I chose to use it.

With the exception of the girls’ pictures, all the stitches on the trunk front remained the same. The entire front is worked in continental stitches.
Here are the right and left sides of the trunk:

Instead of having various cities stitched on each trunk side (like the original pattern), I stitched a simple “Cinderella” style carriage. The carriage was a little tricky because I could not find a pattern small enough to fit.
If you look closely at the pictures you will see that the carriage is positioned only on the small continental, stitches and does not touch the larger, Gobelin stitches. It’s done this way because, if the carriage were to overlap the Gobelin stitches, it would interfere with stitching the inner walls in place later during the trunk’s construction.
Even though it was too big, I ended up using the carriage in the pattern above (with the Anastasia and Drisella picture) as an example and worked this carriage free-hand; moving and deleting stitches as needed to make it fit the space I had.
Here is the back of the trunk:

As you can see, my entire trunk is brown.
The original Dressing Room pattern is pink with purple hardware. Sorry, but pink and purple just wasn’t the look I was going for. I wanted a whimsical, yet mature look. So I used dark brown yarn on all the outer walls of the case and light brown yarn for the handles.

The handles are made from soft plastic canvas and are attached to the top of the trunk. When working the trunk tops you will leave two little sections unstitched, then stitch the handles to the top (using continental stitches) in these unworked sections.
I used grey yarn for the latches. The trunk has two latches with Velcro sewn to the ends to hold it shut. Be sure to sew the Velcro to the latches before attaching them to the trunk. My sister made this mistake on one of her own doll cases and got to experience the thrill of removing and re-working stitches!
When Anastasia and Drisella found out that I let Cinderella do a pictorial tour of her case they begged me to let them do one of theirs.
So here they are–Anastasia, Drisella, the keyboard is all yours!
Note: (Anastasia’s words will be in Pink and Drisella’s will be blue).

EEEE! Hi internet peeps, I’m Anastasia! Welcome to my…um, I mean our house. I can’t wait to show you my side—it’s the best! Why? Because it’s PINK!!
Hello..um…readers (Drisella, don’t call them readers. It’s too…stiff.) uh, okay…hello, I’m Drisella and……..
That’s it! I’m taking over.
Here is my side of the trunk. Isn’t it beautiful! I simply adore pink!!
The flowers on the back wall are stitched exactly how the original pattern calls for. We just changed the colors to light, medium, and dark pink. Drisella’s side is…

Wait, I’m ready now…I can do it.
*Sigh* Okay, here’s Drisella. Let’s see if she can do this.

Hello again.
My side of the trunk is yellow with blue and green flowers. The original pattern also has a yellow back, but it is a bright yellow with white and pink flowers.
I prefer this softer yellow color.
Okay, okay, you’ve talked enough. I’m not finished with my side of the trunk!
Check this out! It’s a storage cupboard to hold those extra special things a girl needs to look gorgeous. You know, like dresses, tiaras, shoes.
Right now I only have one dress, but Amanda promised to sew more for me, so this cupboard won’t be bare for long.

Besides the cupboard, I also have a drawer. I know, I know–you’re thinking, “Geez, Anastasia, it’s just a drawer. Why all the excitement?” Well, for me, a drawer means more storage. And more storage means more dresses, gloves, hats, and shoes!

So, want to know what I keep in my drawers?

More of life’s basic necessities. I’ve got a comb, hairdryer, mirror, and scissors. All super high quality, of course. I think they’re from Macy’s? Or was it Dillards?
Fact Check: I bought these buttons at Hobby Lobby for about $2.99. Sorry, Anastasia.

Fine, so they’re mediocre quality. Now, let’s check out the rest of my room…
Anastasia, wait! What about my stuff?
*Sigh* Fine. Show us your stuff.

These are my drawers. They’re just like Anastasia’s, except they have blue beads for knobs and are yellow instead of pink. See:
Drisella! You keep baking equipment in your closet?
I like baking.
*Sigh* You’ll have to excuse my sister. Apparently, she doesn’t realize that kitchenware doesn’t belong in a dressing room. But, do you know what does belong in a dressing room?

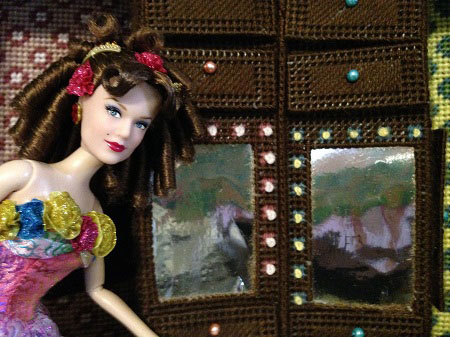
MIRRORS! I love mirrors!
Anastasia, you forgot to show them the table.
Hmm? Oh, right!


So, the trunk comes with a fold-out table.
We added lace to the edge to fancy it up.
In my opinion, the table could be better. There’s a wave in the center where the sides are stitched together. Amanda said attaching the table to the inner front walls was tricky. Still, why settle for a wonky table. This needs to be fixed!
The leaflet also has patterns for other accessories, like these seats.
We made two of these little benches–one for me and one for Anastasia. They are worked using the same color yarn as our walls. Mine is yellow, blue, and green. Anastasia’s is…
Anastasia?


What? Oh, sorry! I had to fix my hair. Where were we?
Benches.
Right. Benches.
Well, here is my pretty pink bench:

These benches are both comfortable (they’re made of yarn, after all) and functional. The seats lift up offering you even more space to store your things. I plan to put extra clothes in mine, but you could use it to hold a doll-sized blanket and pillow.
We also have a lovely carpet that folds down when the trunk is open.

The carpet is nice and soft. Too bad it’s not pink.
The benches aren’t the only furniture pieces the pattern offers. There are also instructions for making a changing screen and fainting couch. Since we were running out of room, we chose to skip the couch and only made the screen.

The changing screen is made of three sections and folds up for easy storage. Although, it’s not pink, it’s still very pretty. Even more importantly, it provides plenty of privacy.

Well, friends, that’s everything!
Anastasia and I hope you liked touring our Plastic Canvas Dressing Room!
See you later! Goodbye!
Thank you, girls. I hope everyone enjoyed Anastasia and Drisella’s tour. Now then, I thought I’d wrap this post up by showing y’all a comparison of this case versus the Plastic Canvas Travel Trunk I made for Cinderella.

The case on the left is the Dressing Room and the case on the left is the Travel Trunk.

In my opinion, the Dressing Room has more storage and detail, but the Travel Trunk’s pattern is easier to follow. I spent about a week working on the Travel Trunk, whereas the Dressing Room took closer to a month.
I hope you enjoyed this glimpse at these one-of-a-kind plastic canvas cases for Barbie dolls (as well as Anastasia and Drisella’s little tour of their travel trunk)!
See you next time!
