
I guess you could say that, in between doll reviews and life’s daily tasks, I’ve managed to be a tiny bit creative. Except that this time it was all digital?

Pinterest is by far our favorite social media platform. I could spend hours (and sometimes do) pinning pretty images and getting project ideas.
However, our boards lacked style. They had very little visual appeal and it was hard to tell what kind of pins each board featured. Definitely NOT a good first impression?.
So, I decided it was time to put my limited computer skills to work and give our Pinterest boards some pretty covers!
How To Create A Custom Cover For Your Pinterest Boards:
You can use almost any photo editing software (such as Picmonkey, Photoshop, and Illustrator) to create covers for your Pinterest boards. My favorite platform happens to be Canva so I will be using Canva for this tutorial.
*In order to use Canva, you’ll need to sign up for an account. But don’t worry–it’s free!
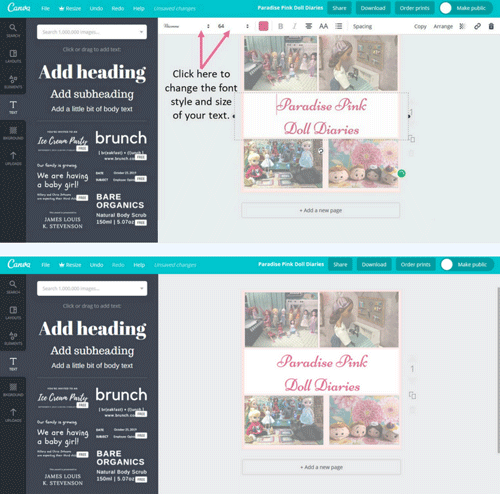
- Begin by opening a design that is 800 by 800 pixels:

- Before adding any logos or photos, let’s change the background color:

- If you’re a blogger and use Pinterest to promote your blog, it’s a good idea to stick with colors that reflect your brand. Since our site has a lot of pink elements, I’m going to set the background color of my design to light pink:

- Now we can begin adding photos:

- Click on Uploads.
- Then click Upload Your Own Images to add pictures from your computer to Canva.

You can use free stock photos, your own photos, graphics, drawings…whatever you like! Just make sure the images you pick are free for personal and/or commercial use. I am using images from our blog header so, when it comes to copyright, we’re good to go?.
Optional Step: Since I want this graphic to have a soft, misty effect, I’m going to add an overlay to it.
- Creating an overlay is super simple! Just add a square element to your design:

- Change the color to white and enlarge it until it covers the entire image:

- Make the square semi-transparent by clicking checkerboard icon and using the slider to adjust the transparency:

- Next, add the title of your Pinterest board by placing another square element and shaping it into a rectangle:

- Choose a color that will make your text stand out and move the rectangle to wherever you want your board’s title to appear. I like the way it looks when centered, so I’m going to place it in the middle of my design:

Since I didn’t want the images to be obscured by the title, I had to go back and tweak my design.
- Now add a text box, place it on top of the rectangle you just created, and enter the title of your Pinterest board:

- Change the font type and colors to match your board’s style:

- Once you’re happy with the overall look of your design, hit the Download button to save it to your computer:

Now that we have the perfect graphic to use as our board cover, let’s go upload it to Pinterest!
- Log in to your Pinterest account and click the plus icon to add a pin:

- Click Your Device to add a picture from your computer to Pinterest:

- Type in a description for your pin (I just entered the same description that I used for the board) and save it to the board that you want this image to become the cover for:

?Congratulations?
Your image is officially a pin!
- But we’re not finished yet! After uploading it, we’re going to set the website address of our new pin to the URL of its board:

- Copy the address of your Pinterest board.
- Click the pencil icon to edit the pin you just uploaded.
- Paste the address of your Pinterest board into the Website box.
- Finally, click the pencil icon near the top of the board:

- Then scroll down till you see the word cover and click Change:

- When your pin shows up click Save Changes:


Thank you!
You're welcome!:)
-Quinley
I love your designs for your Pinterest boards.
-Quinley