
What happens when you leave an ailing girl alone in bed with an iPad and credit card? Shopping, that’s what!
It’s a shame, really. I usually have such self-control. But my bout with Covid a few weeks ago weakened my resolve, and simply browsing the online aisles of Amazon and Etsy turned into ‘add to cart’ and ‘checkout.’ Oops!
What did I buy? Well, some chairs, for starters!

The papasan chair is from Claire’s (I ordered it through their website). Even though it’s meant to be a cell phone holder, it’s perfectly sized for the dollhouse—not to mention super cute! At least, it will be once I replace the cushion. That yin-yang style is totally throwing off my fairytale farmhouse aesthetic😆.

The ghost chair is an Amazon find.
I originally wanted a set of barstools, but the only colors available were bright red, neon green, and royal blue. Yuck!
So, I settled for a ghost chair. It’s not quite tall enough for Elsa’s island, but I think I can make it work.
Besides chairs, I also picked up a few kitchen essentials, like this countertop oven:

I bought this oven off Etsy but have found similar ones on Amazon (I think they’re Re-Ment). And ovens aren’t the only thing available. I’ve seen everything from blenders to coffee makers and even pressure cookers!

Elsa’s oven is minty-blue, but it also comes in pink or cream.
It has vents sculpted on the sides, silver hardware, and grates that move back and forth when you open the door. How cool is that!
My favorite pieces, though, are these decorative plates (another Etsy find).

I fell in love with these itty-bitty plates the moment I saw them. They’re about an inch in diameter, which technically is too small for Barbie, but I plan to use them in Elsa’s apartment anyway.
Of course, I couldn’t leave Tink out. She got a little wagon for carting around her fairy-sized treasures.

I know these fun finds have nothing to do with sewing, but I thought y’all might enjoy seeing them, especially since they’re sure to pop up in future posts😉.
Now, let’s get to today’s real topic: Meeshell and Farrah’s new attire!

A Mermaid Tail For Meeshell!

This mermaid tail was designed by Requiem Art Designs—one of the few shops offering patterns for Ever After High dolls.
When it comes to beginner-friendly sewing patterns, this one takes the cake. All you need is 1/4 yard of fabric, some tulle or lace, a needle and thread, and basic sewing skills.
The tail can be sewn by hand or with a sewing machine. Meeshell’s is handsewn.

The first step is creating the fins—an easy-peasy process if you follow the pattern. You just cut the sections from thin material, like tulle or lace. No sewing required! The result is a pair of soft, flowy fins.
I, however, wanted a solid fluke that looked more like a whale’s tail, so I swapped out the tulle for shiny pink lame. I then deviated even further by sewing the fins together, creating a single flipper instead of two gossamer-like fish fins.

Although it’s not as billowy as the example on the pattern, Meeshell’s fluke has plenty of flip!

What’s better? Whale Tails or Fish Fins? It really boils down to the type of mermaid your doll is. Is she an open ocean mermaid who dives deep and travels long distances? Then she probably needs the strength of a full-blown fluke. A tropical mermaid, on the other hand, may prefer feathery fins for a gentle swim along the reef.

The tail’s main section can be made using any fabric you like. Printed cotton, stretchy knit, shiny satin…whatever floats your boat! Just make sure the material you choose isn’t too thick (e.g., duck cloth or denim are never good choices for doll clothes).
For Meeshell’s tail, I picked this mermaid-scale calico with a gradient effect:

The tail body consists of a front panel and two back pieces. Before sewing the side seams, the pattern has you sandwich the fins between the tail sections to connect them.
Don’t worry—this isn’t as complicated as it sounds. Plus, there are pictures showing exactly how to lay the fins so they get fully incorporated into the tail tip.
The next steps are creating the waistband and pectoral fins. The pectoral fins were the trickiest to sew, mostly because I used an ultra-thin, iridescent organza that was very fray-happy. Even Fray Check couldn’t hold its delicate fibers together!

How did I solve this fray-tastrophie? By spreading a little watered-down Elmer’s glue over my swatch. This stopped all unraveling, allowing me to cut out and sew the fins.

For the waistband, I chose light blue lame, which gave me an edge that shimmers like the fluke but is the same color as the top of the tail.
After attaching the hip fins and waistband, just sew on a closure (I used Velcro), and your tail is done!

Since no mermaid costume is complete without a matching top, the pattern also includes instructions for an easy-sew seashell bra.
Again, you can use whatever fabric you like for this part. I went with a tie-dyed Jersey knit.

The bra shown in the pattern is strapless, but I added straps to Meeshell’s because it kept sliding down. This might not have happened if I’d used a non-stretch material, but this knit was the perfect color; thus, beauty trumped function.

I think it’s safe to say that Meeshell is thrilled with her new look. She’s officially a mermaid!

I know how she feels. I love it too!
So, while our happy mer-doll enjoys splashing around in the sea, why don’t we head over to Farrah’s room and see her lovely new gown.

A Fairy Gown For Farrah!
I dubbed this dress a “fairy gown” because of its soft, graceful design. Of all the clothes in my dolls’ closet, I’m most proud of this one. It turned out absolutely perfect. A rare feat in sewing!
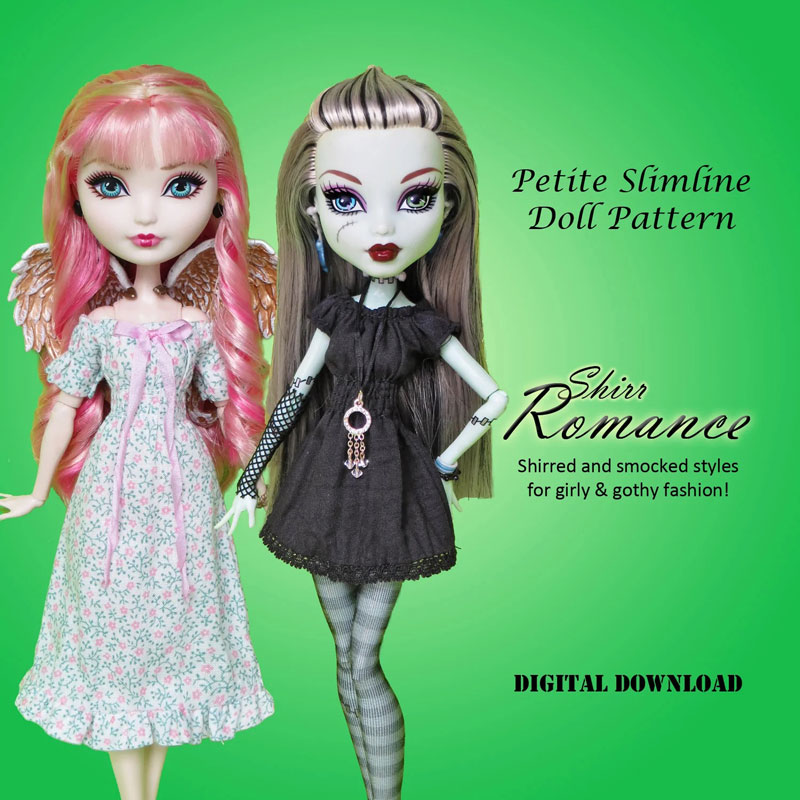
The pattern is called Shirr Romance.
It’s more challenging than Meeshell’s tail, but that’s because it teaches you a brand-new technique: Miniature shirring and smocking!
What is shirring/smocking? Shirring is the altering of baggy, oversized clothing into shapely garments using gathers and elastic thread. After winding the bobbin with elastic thread, the seamstress sews multiple parallel lines across the area that needs shrinking—usually the neckline, bust, or waist. The result is a shirt, dress, or skirt that stretches when pulled on and off.
Smocking, on the other hand, ditches the elastic and uses embroidery floss to secure the pleats. Since there is no elastic, smocked outfits aren’t as flexible as shirred ones (in human wear, that is), but the embroidered details give a fancy appearance. So, while both techniques create stylish, better-fitting apparel, shirring is considered more comfortable due to its elasticity.

There are four ways to construct the dress:
Farrah is wearing the shirred version with a long skirt and ruffle.

The overall makeup of the dress is pretty simple. It’s a basic shift with a Velcro fastener in the back.

The shirrs, however, transform it from plain jane into fairytale finery!

The dress is gathered (or shirred) at the neck, sleeves, and waist.

Like the other outfits I’ve shown you, Farrah’s entire gown is handsewn—shirrs and all!

The shirrs are secured on the inside with a ribbon backing.
These narrow strips of ribbon help hold the gathers in place and keep them from loosening over time.

That’s right. Because elastic thread is thicker than normal thread and would bulk up our tiny 1/8-inch seams, this pattern forgoes the elastic. Instead, the shirrs are secured using other methods, one of which utilizes ribbon. The other two are carefully sewing between the gathers with your sewing machine (no ribbon required) or stitching over the gathers with embroidery floss for a smocked look.
Since I didn’t feel like pulling out the machine, and my embroidery skills aren’t up to par, I chose to lock my gathers with ribbon.

Obviously, this dress doesn’t stretch like one with traditional shirring would, but that’s okay. The dolls don’t mind. It’s all about style for them😉.
I’m a little surprised Farrah’s gown turned out so well. I didn’t even know what shirring was when I bought the pattern, much less sewn it! As far as I was concerned, it could only be done with industrial equipment in some factory overseas.

But this project introduced me to a whole new world of DIY fashion for both dolls and people. Granted, I’d have to switch to elastic thread for any human-scale shirring, but that doesn’t scare me. I hear it’s super easy.
So, I say this dress is a win-win all around!

Believe it or not, the last two posts are just a small sampling of my recent sewing achievements. Like I said before, I was stitching up a storm before that darned virus struck. Still, while it may have slowed me down, it didn’t knock me out😉.
So, what’s next on the crafting schedule? Well, I hear Elsa is a little tired of living in a half-made room, so I think it’s time to revisit her apartment and finally finish it!


I loved this! Meeshell looks just gorgeous, and Farrah’s dress is so dreamy! Great to see another post, I always enjoy your style.
Thank you! I’m glad you liked the post😁.