
If you’ve visited our Pinterest board, you’ve probably seen the Plastic Canvas Barbie Travel Trunk I created for Cinderella back in 2015.


I made it following the Plastic Canvas Fashion Doll Travel Trunk pattern I purchased from Annie’s Craft Store.
I’d never made a doll traveling case before and, at the time, thought this one was pretty good. But, after looking at it for a few weeks, I saw some mistakes—several, in fact. And they started bugging me.
First of all, the words on the front were hard to read. It says, “Have Courage And Be Kind” (Cinderella’s motto), but the little flowers around the letters make it barely legible.
The second problem is that I inserted foam board instead of poster board between the outer and inner layers. The pattern calls for poster board, but I (being a total ditz) bought foam board. By the time I realized my mistake, it was too late. I’d already sandwiched the foam board between the layers and stitched them together.
Of course, this made the case way too bulky. But I didn’t want to redo it! The interior was so pretty, and I was worried that pulling out the stitches would ruin it. So, I left it alone and tried to ignore its flaws.
Eventually, though, I couldn’t take it any longer. I had to fix those mistakes—make the words readable and remove that stupid foam board!
And do you know what? I managed to do just that without destroying the case! Yippee!
But, before I show you how I fixed the travel case, Cinderella would like to take you on a quick tour through her new house. She loves it even with its flaws (so sweet😊).
A Tour Of Cinderella’s Plastic Canvas Travel Trunk:
Hello, all! Cinderella here!
Welcome to my house…er…case. Hmmm, perhaps I should call it a mobile home?
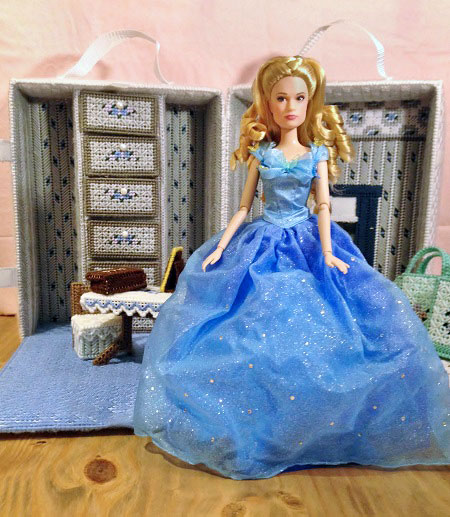
Amanda (our human guardian) made this doll-sized carry case for me using stiff plastic canvas and yarn. Quite ingenious, don’t you think? Of course, we did tweak a few things to fit my personality. For example, we changed the yarn colors from pink and white to light blue and grey.
The right side of the case has a closet with drawers, a nook for storing some furniture, and a place for me!

The left side is completely open. It has a window with dark blue curtains, a plant, and a table. As you can see, though, all of these are stitched to the wall and purely decorative. The pattern has you put a mirror in the window, but we decided to use a picture of Amanda’s horses. They’re much prettier than a mirror!
There are also instructions for a few furnishings, such as a daybed, table, chairs, and totes–lots of them! Here is a peek at the table, chair, accessories, and two of the totes:


Pardon me a moment. I’m afraid I must change gowns before going on.

I’m terribly sorry about that. I adore my ball gown, but all those beautiful layers make sitting at a table difficult. Amanda gave me this peach outfit a few days ago. She calls it a “flapper” style dress. I have no idea what inspired her to sew it. It’s way too short! But please don’t tell her I said that. I don’t want to hurt her feelings.
Now, where was I? Oh yes…the tour!
Besides tote bags and furniture, the pattern also has directions for making a jewelry box, a mirror, and a stool. Here is a look at the jewelry box:

We used brown yarn and embroidered my name in gold on the top. I keep a few trinkets in it, like my roue d’épingle papillon–a simple butterfly pinwheel we made by gluing a couple of tiny polymer clay butterflies to a bobby pin.
My favorite accessory, though, is the picture.

Instead of reflective tape, we slipped a drawing of my mother into the frame, changing it from a mirror to a treasured keepsake! The picture is from a Cinderella book that was published around the same time as the live-action movie. In my opinion, it’s much sweeter than a mirror.
Oh, dear, it looks like Fairy Godmother has come for a visit! Excuse me. I’ll be right back…

Heavens girl! What are you wearing? Who did this to you?

I am so sorry about that, dear friends. I guess she didn’t know I was giving a tour.

Fairy Godmother insisted I change back into my blue gown (which I was more than happy to do). She’s also taken it upon herself to discuss the too-short flapper dress with Amanda—and dispose of it!
I hope you enjoyed seeing my little travel case! I know it isn’t as elaborate as other doll rooms, but I adore it. It’s quite cozy.
I’m glad to know Cinderella likes her case! However, I didn’t realize she hated the dress so much. I thought it was trendy? Oh well. This just gives me an excuse to sew more doll dresses😉.
Now, let’s move on to overhauling the case. Here is the newly reconstructed version:

Yay! We can finally read the words! I also replaced the foam board with poster board, making the travel case much sleeker.
To do this, I pulled out the overcast stitches securing the front of the case to the top, bottom, and unhinged side. I left the hinged side alone because I didn’t want to re-hinge the entire thing.


Once I had access to the inside, I pulled out the foam board and inserted the poster board. Easy peasy!

Lastly, I changed the text. Working in small sections, I removed the letters and re-stitched them in an easier-to-read font.
Once everything was fixed, I re-attached the open panels, then moved to the opposite side and repeated the process.
And voila! A Plastic Canvas Travel Case perfect for Cinderella!

So for those of you tinkering around with plastic canvas patterns like this, don’t feel forced to use colors and phrases you don’t like. Have fun putting your own unique spin on your creations. Sure, you may make mistakes, but plastic canvas crafts are very forgiving. Just pull the stitches out and try, try again😉!
Thanks for reading, and stay tuned because we’ve got more doll cases coming up soon!

