
I have some exciting news to share today! Just this month one of our rescued cats had a litter kittens!
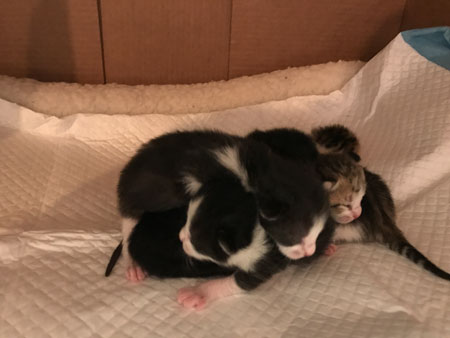
That’s right! Five of the tiniest kitties you’ll ever see!

You see, besides being a typical do-it-yourself kind of family, we are also major cat lovers! In fact, I can’t remember a time when we didn’t have at least one cat in our household; and any feline that’s ever crossed our threshold has been a rescue.
This Mama Cat was no different:

When we first spotted her wandering through our yard she was starving, malnourished, and wormy. It was a pitiful sight.

However, after few bags of cat food and a trip to the vet, she’s right as rain and has successfully delivered these sweet little kitties!

So, I thought it would be fun to go off topic today and create something special for us “crazy cat ladies” and our feline companions!

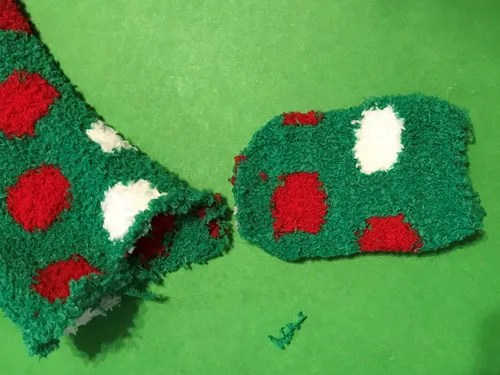
I am going to use recycled socks to make catnip filled mice (this is a great way to recycle those old socks who’ve lost their match ?).
Supplies needed:
- A Sock
- Needle and thread
- Yarn
- Embroidery floss
- Felt
- Stuffing (pillow fluff, batting, etc…)

Optional:
-
Catnip
-
Squeaker

- Begin by cutting a small oval from the sock:
- With right sides together, sew down both long sides and one short side of the oval (soon to be mouse):

- Then flip it right side out:

At this point, you can start stuffing the mouse and filling it with goodies like catnip, squeakers, paper to make a crinkly sound, etc… Since catnip tends to cling to everything it touches, I made a small “bag” to contain it and eliminate the mess.
- Make the catnip bag by cutting a small square from the sock:

- Take a strand of embroidery floss and, using a large needle, lace it around the section of sock you just cut out. Leave the ends of the floss long and loose for tying up the bag:

- Now pour some catnip into the center, and pull the embroidery floss to gather the edges of the bag and enclose the catnip.
- Then tie a knot around the bag and snip off the ends of the floss:

There! The catnip is secure in its own little bag and no longer a threat to my clothes or carpet. Putting the catnip in a bag before placing it inside the mouse not only makes adding the catnip easier, it also adds an extra layer of security in case one of the cats tears a hole in the mouse. Now let’s begin stuffing this mouse!
- Add a small amount of fluff:

- Followed by the catnip bag:

- And, for some additional fun, a squeaker:

Before sewing up the backside, let’s give this mouse a tail using a cat’s favorite material…YARN!  My cats LOVE yarn so giving this mouse a long yarn tail was a no-brainer.
- To make the tail, cut several strands of yarn and braid them together:

- Push part of the braided strands inside then stitch up the opening, making sure to catch the strands of yarn as you sew past them:


Now we have a plump, fuzzy ball with a lot of colorful yarn at one end. Let’s make this toy look “mousier” by giving it a simple face.
- Use black embroidery floss to add eyes:

- Cut semi-circles of felt for ears:

- Sew the ears to the top of the mouse, right above the eyes:

- Finally, sew on a little nose using more embroidery floss:

 Now you have an adorable toy perfectly suited for your feline friends! Let’s see how the cats like it…
 Bagheera certain seems intrigued!


I know this was completely out the realm of dolls; however, cats (and animals in general) are a large part of my life so I thought it would be fun to toss in a craft inspired by them.
Hopefully, you enjoyed this off-topic post and have fun making your kitties some one-of-a-kind sock mice!

Thank you! Glad you liked the kitty pictures!
Awesome craft idea!:) Your cats are adorable.
-Quinley