
After reviewing Zuru’s 5 Surprise Mini Brands, I couldn’t help heading back to Walmart for more. They are just too cute! This second batch of Mini Brands had several new items—and a few more doubles.


Now I need someplace to keep all these adorable goodies, so I’m going to turn a cardboard box into a grocery store for my dolls.

The Supplies:
- A heavy-duty cardboard box (I bought mine at Walmart).
- An X-Acto knife and scissors.
- Scrapbook paper and/or contact paper (I used both).
- Hot Glue and/or Tacky Glue.
- Scraps of cardboard or foamboard.
Constructing the store is fairly straightforward. You’re just taking a square box and turning it into a basic doll room. I am using a 14″ X 14″ X 12″ box.
Before grabbing the scissors and cutting up cardboard, we need to choose a layout for our store. Do we want it to be square or rectangular? Let’s take a look at both options.
How To Make A Square Doll Room Using A Cardboard Box:
- Cut off the top tabs of the box.
- Glue down the bottom tabs.
- Turn the box on its side and cut out the center of the top.

- Cut out doors and windows and begin decorating!
How To Make A Rectangular Doll Room Using A Cardboard Box:
- Cut off the top tabs and cut down one side of the box so the whole thing lays flat.
- Fold in the right and left sides and glue side tabs on top of the back ones.
- Use the tabs you cut from the top to fill in the gaps in the floor.

- Cut out doors and windows and decorate!
A square box is great if you don’t have a lot of storage space, but the rectangular one offers more room for play. Since I want the best of both worlds, I’m going to combine the two methods to make a rectangle-shaped room that folds back into a square.
How To Make A Doll Room That Folds-Up:
- Remove the top tabs and cut open the box so it lays flat.
- Fold in the right side of the box to make a corner and glue down the right tab. You should have two sides that are attached and two that are free.
- Move to the next loose section (a middle one), fold it in, and glue its tab down. This middle tab should abut the right tab.
- Leave the far left side and its tab loose–this is the fold-out wall and floor of our grocery store.

Here is how the box should look:

Now we need to extend the left floor so it is the same length as the right side.
- Take one of the tabs that you cut from the top and glue it to the front edge of the left floor to extend it. I used hot glue to attach the extra cardboard then reinforced the seam with clear packing tape.

And that’s it! You should have a box that opens into a large room for your dolls and also folds into an easy-to-store square when you’re done using it.

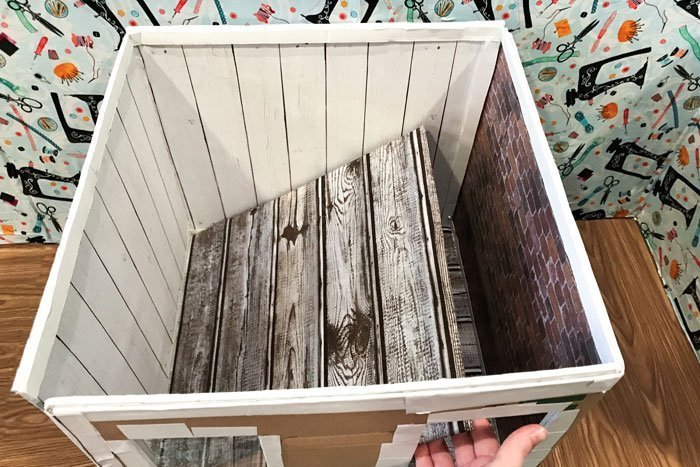
Now we can move inside and add some color to those boring brown walls!
Decorating The Walls:
I want my store to have a working door, so I cut out a large opening for a door and also a window to let in a little extra light.

After cutting out the door and window, I covered all the raw edges of the box with white computer paper. If you’re a perfectionist like me, this step is imperative because it gives the edges a clean, finished look.
Once the edges were nice and tidy, I glued scrapbook paper over the inside walls and wrapped the floor in contact paper.

I love using contact paper for folding doll rooms. It’s a bit stronger than scrapbook paper and perfect for covering areas where two pieces of cardboard are joined together (like the extension we added to the floor).
Next, I added a piece of foam board to the back corner to support the back and right walls. Then, for the finishing touches, I glued poster board around the bottom of the room for baseboards and foam board around the top and door for casings and molding.

The baseboard and door trim looks fantastic; however, the foam board bordering the top is—well—ugly.
First of all, my strips aren’t at all straight.

Secondly, the foam board is horribly creased. Foam board will bend when it’s cut into thin strips; but, as you can see, it wrinkles. Since the back wall folds in, the foam board on that side is full of crinkles and dimples.
A grocery store with crumpled trim is totally unacceptable, so I replaced all the foam board at the top with poster board.

Poster board is definitely a better choice for trimming out doll rooms with folding walls. White computer paper is also a great option (and inexpensive). Still, I prefer poster board because it’s opaquer.
Well, friends, that’s it for today. I hope you enjoyed seeing my current craft in progress. Next time, we’ll start working some shelves and counters to hold our Mini Brands!

Yes, I suppose we’ll need a freezer section too. We can’t have ice cream melting all over our pretty floor?.

Creating doll rooms is so much fun. I like using Contact paper too. I like using strips of white Contact paper to cover raw edges.
Yes, contact paper is great for doll rooms (I think it’s easier to work with than scrapbook paper). And using it to cover the raw edges is a brilliant idea! I’m totally doing that next time?.
AWE! Luv it!
Thank you?!
Mon Plaisir! Your a great Crafter!