
Welcome to the grand finale of our How To Make A Doll Room In A Decorative Box series:

Today we are going to show you how we decorated and added the finishing touches to Cedar Wood’s craft room in a box! But first, let’s take a brief look back at what we’ve done so far…
We started with a large decorative box from the craft store: In Part One we made a floor for our craft room out of cardboard. The floor is attached to the box with paper clips and can be folded up, making our doll room easy to store.
 In Part Two we created a bed, and what’s so awesome about this bed is that it doubles as extra storage space (or even a place to keep your doll) when you stand it upright.
 All that was need to turn this box into a cozy, craft space were a few more furniture pieces and some much-needed art supplies.
Well, I finally found time to finish up these little details so now Cedar can show off her completed doll-sized craft room!
Since Cedar is so proud of her new room, I’m going to let her lead you on this tour!


Wait, hold on just a second! You’re skipping over all the important stuff! Like how I made the shelves, yarn, etc….

Lots! Yes, Cedar’s shelving unit is made from sticks–popsicle sticks to be exact:
- I started by cutting and laying out popsicle sticks–six sticks for the back and two for the sides.
- Then glued the side popsicle sticks to the top and bottom back pieces.
- Once the glue was dry, I flipped everything over and finished gluing the remaining four popsicle sticks to the back.
- Finally, I glued a popsicle stick to the bottom of the unit (bottom shelf) and one to the top (top shelf), to finish the basic frame for the unit.

- I also added an extra popsicle stick to both sides, the top, and bottom to make the unit two popsicle sticks deep instead of one.
- Finally, I glued the inner shelves in place–each shelf is also two popsicle sticks deep.
 That’s not all. I also had to make the cutting mat and the yarn.
The cutting mat came about by accident. Honestly, the thought of adding cutting mat hadn’t even occurred to me! However, when I was looking for little yarn labels, I stumbled upon a web page with lots of doll-sized sewing printables and this cutting mat was one of them: Making the mat was as simple as printing and cutting out the printables, then gluing them to a piece of green craft foam.
These tiny skeins of yarn were made using embroidery floss:
- I rolled the floss around my finger until it resembled a doll-sized skein, then wrapped the loose end around the middle to keep the skein from unwinding.
- I found cute, mini, yarn labels at this website–this is the same site where I found the printable for the cutting mat–printed them out, and glued the labels around the middle of the skein to finish the look.


Cedar! You skipped the details…again!

I made scrapbook paper for Cedar by cutting regular sized pieces of scrapbook paper into two-inch squares. Adding a few doll sized sheets of scrapbook paper was an idea left by one of our readers (thank you Treesa!), and was a wonderful way to give the room even more of a “crafty vibe”.
And the batting on top of the shelving unit is a real roll of batting: I made this package of quilt batting by rolling up a little piece of real batting and gluing a label around the roll–the site with the yarn labels and cutting mat printable also had this batting label. After fixing the label around the batting, I wrapped the roll in a piece of plastic cut from a Ziploc bag, then twisted and secured the ends.
The paint jars are tiny glass jars that are painted on the inside with acrylic paint. The paint brushes are cut toothpicks that have been dipped in paint:
Then we have the awesome window–which Cedar didn’t even mention!
A window is just what this large, open space on the left side of the room needed. It dresses up the area without adding too much dimension which would keep the door from closing:
- The faux window was made by gluing a piece of plastic (another piece of material recycled from Cedar’s box) between thin popsicle sticks.
- After the glue dried, I added another layer of popsicle sticks to the back, the two short sides, and the bottom edge. This made the window pop away from the wall just a bit (you’ll see why I did this here in a minute ?).
- Then I faux stained the window frame using watered down brown acrylic paint.
- Finally, I glued the window in place on three sides only–the right, left, and bottom sides.
I left the top open so I could add a photo and give Cedar some outdoor scenery! Yes, the window sticks out just enough for me to slip a photo between the plastic and the wall, but not enough to interfere with closing the door. If you want to change the view, just switch out the photo or use a piece of scrapbook paper instead.
The left side is looking pretty darn good….well, except for that silly tear in the corner:
I tried using a light purple marker to hide the tear: Bad idea! I should have known markers weren’t the way to go.
Hmmmm….okay better idea?
I successfully hid the tear (and marker mishap) using this pretty, pink, lace as a curtain! 


The pencils on Cedar’s table are made from toothpicks just like the paintbrushes:
- To make the pencils I simply cut the toothpicks to the length I wanted.
- Then colored them with permanent markers–easy peasy!
I also made Cedar a pencil holder for her new pencils: Making a pencil holder is also very easy! It is just a paper tube with a piece of craft foam at the bottom. Since the outside of the holder was plain white I decorated it with Washi tape to make it pretty! The sewing machine is a dollhouse miniature from Hobby Lobby, and the magazine holders came from another printable that I traced onto cardstock. But the real jewel of this space is….
The Cork Board! Yes, Cedar, it is beautiful (if I do say so myself ?)!
Let’s have a closer look: After watching the Doll Craft Room video (created by My Froggy Stuff) on YouTube, I knew right away that I wanted some kind Cork Board/inspiration board for Cedar’s room. I made this board by following the instructions in My Froggy Stuff’s tutorial using a cereal box, burlap ribbon, and thin popsicle sticks. Even though my board is smaller than the one in the video, I still managed to fit plenty of stuff on it!
Starting at the left side we have:
- A shelf holding three bottles of craft paint. The craft paint bottles are made from white paper that I rolled into tubes and wrapped with colorful duct tape.
- Another shelf holding a box of ‘Ceylon Tea’ and a small package of sewing needles (printables glued to paperboard). Giving Cedar a few tea-themed items was another idea from one of our readers (thank you, Quinley!).
- Then we have a peg (toothpick) holding a pair of scissors (a button).
- A glass jar holding a few more, clean, paint brushes.
- Two more shelves on the right are holding spools of thread.
- And, finally, we have a ribbon rack filled with colorful ribbon!
I made the desk using small popsicle sticks and paper board (like the one in the tutorial) but ended up giving it straight legs instead of A-frame legs: The A-frame legs were adorable, and I really wanted the desk to have them, but they stuck out too far. The A-frame legs kept the desk from fitting in the space next to the bed…so they had to go. I also wanted this desk to have a “patina-ed” look, so I painted it brown then dry brushed it with a mixture of black and a tiny bit of light blue.
 Yes, I finished Cedar’s bed! Since I already used trim from my old sewing machine to decorate the top of Cedar’s bed, I went ahead and used the fabric that covered the box to make her bedding.
- To make the comforter, I cut two sections of fabric–one piece from white cotton and another from fabric recycled off the sewing box–then folded over and hemmed the top edge on both pieces.

- After hemming the top edges, I placed the fabric with right sides together and sewed the sections together on three sides only. The top (hemmed) edge I left open.

- To finish the comforter, I flipped the fabric right side out and pressed it with an iron to remove the wrinkles.

Nope, I never closed up the top edge. Would you like to know why?
 To hold pillows! Since I didn’t sew the blanket closed, I now have a place to store Cedar Wood’s pillows (and other stuff that might float around her room) when I’m not using them.

Yes, everything fits neatly inside Cedar Wood’s box…
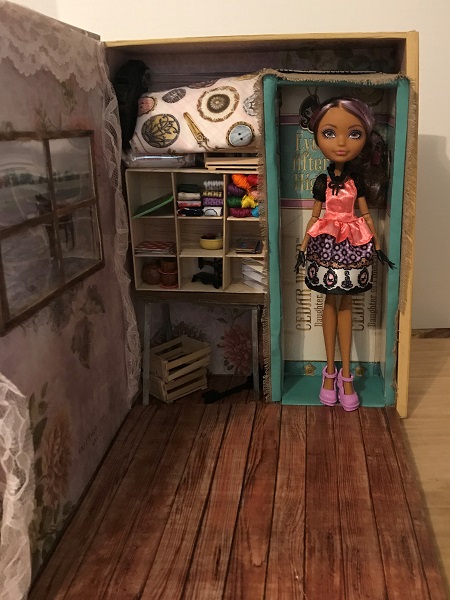 …including Cedar!
When playtime is over, you just fold the floor up: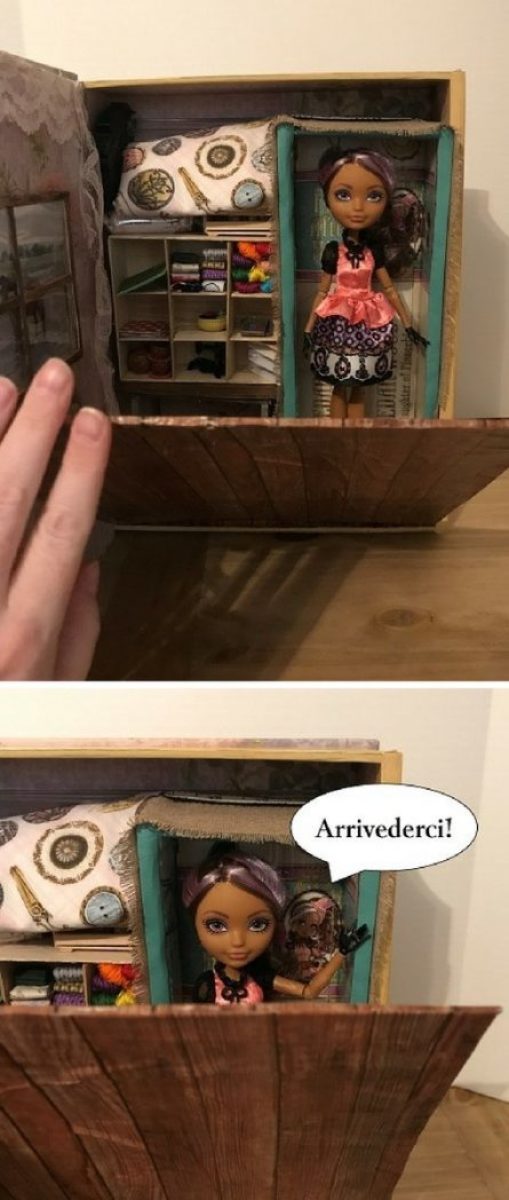
And close the box lid: You’d never know there was such precious treasure inside this book!
Well, that wraps up our posts featuring How To Make A Doll Room Out Of A Box! I hope you enjoyed this little series! I know I had fun making it!
And, for those who want to create a craft room for their own dolls, here is link to the miniature sewing room printables I used: Doll Sized Sewing Room Printables.

AWESOME finished project. Thanks for sharing it, and thanks for the shout out.
Signed, Treesa
thank you for using my idea!:) And I love how it turned out
-Quinley
Your welcome! I'm glad you liked how it turned out?
This project was a lot of fun and it was really neat to be able to incorporate some of our readers ideas into it. Glad you liked it!!