
Last year I didn’t make a single Fall craft. Heck, I barely eked out a Christmas craft! The holidays simply flew by too fast.
Well, that’s not happening this time around because today we are making mini fabric pumpkins for our dollhouses!

Supplies Needed:
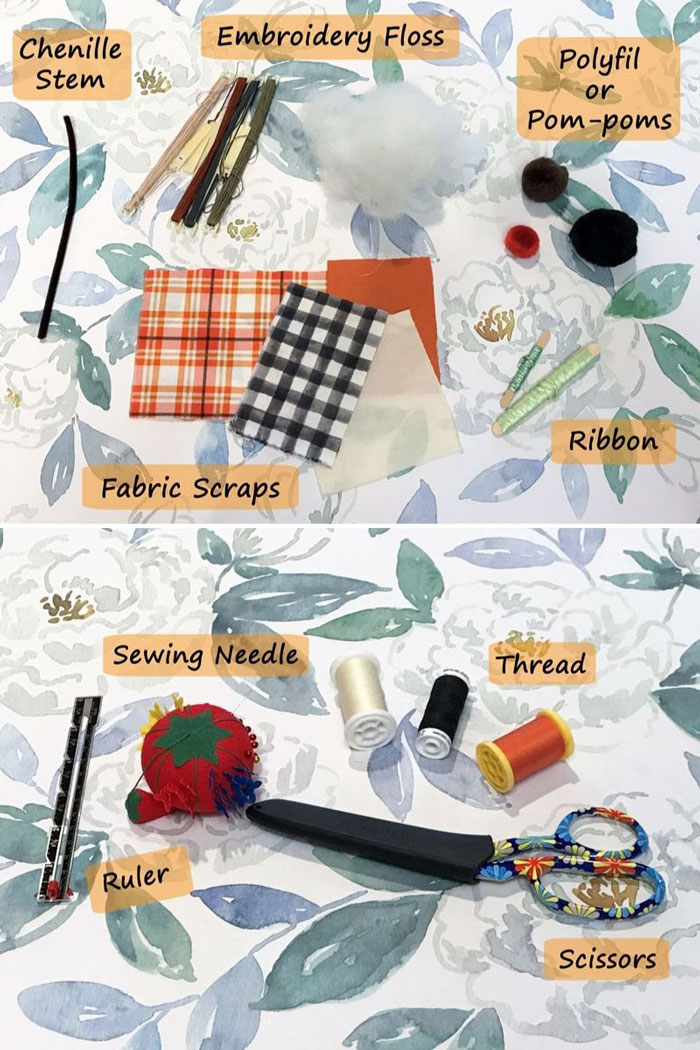
- Scraps of fabric.
- Pom-poms or Polyfil.
- Brown chenille stems.
- Embroidery floss (pick colors that coordinate with your fabrics).
- Green ribbon.
- Basic sewing supplies (needle, thread, scissors, etc.).
How To Make Fabric Pumpkins For Your Dollhouse:
- Cut a rectangle of fabric that is twice as long as it is wide. I cut several pieces with varying lengths to make different sized pumpkins.

The long strips will make big, round pumpkins, and the short strips will make squattier ones.
- Fold the fabric in half (right sides facing each other), and sew the seam opposite the fold. Knot and snip off the thread.

When you’re done, you should have something that looks this:

- Open the tube and sew a running stitch around the bottom edge. (The bottom is whichever end is most unsightly😉).

- Pull the loose ends of your thread to gather the fabric and close the bottom. Sew a couple more stitches for extra security, then tie a knot and cut the thread.

- Flip the fabric right side out.

I know this doesn’t look very pumpkin-y right now, but that’s because we haven’t stuffed it yet. Once we fill and tuft it, this will look just like the fabric pumpkins you see at Hobby Lobby (but miniaturized😉).
Since I have a hoard of pom-poms that need to go, I’m filling my pumpkins with pom-poms, but feel free to use whatever stuffing you have on hand. Polyfil, cotton balls, or even fabric scraps are excellent substitutes.

- Before putting the pom-pom (or stuffing of your choice) in the pumpkin, wrap a chenille stem around it and snip the stem to an appropriate height.

- With the stem sticking upward, push the stuffing into your pumpkin.

- Sew a running stitch around the top to close it just like you did for the bottom.

Because I’m a perfectionist, I’m folding over and hemming the raw edge as I sew to give my pumpkin’s top a clean finish. You don’t have to do this, though. It’s totally optional.
- Once you’ve worked your way around, pull the ends of your thread nice and tight to close the top.

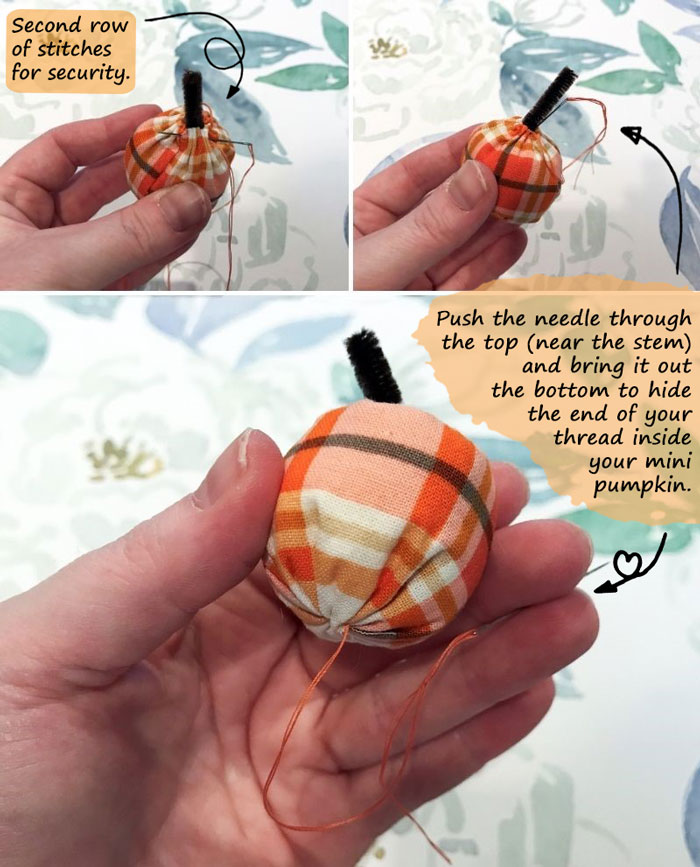
- Sew another row of stitches around the top for security, then knot the thread and bury the ends inside your pumpkin.

Don’t fret if your pumpkin is a bit misshapen at this point. It just needs a little squeezing (and maybe some squishing) to re-adjust the stuffing and make it sit flat.

Now we need to give our pumpkin a few segments. This is where the embroidery floss comes into play.
- Cut a long string of embroidery floss, thread it through your needle, and tie a knot at one end. I used all six strands on the larger pumpkins and about three strands on the small ones.
- Dive down through the top of your pumpkin (next to the stem) and pull the needle out the bottom.

- Give the floss a slight tug to bury the knot inside.
- Loop the floss around and stick the needle back through the pumpkin’s core.

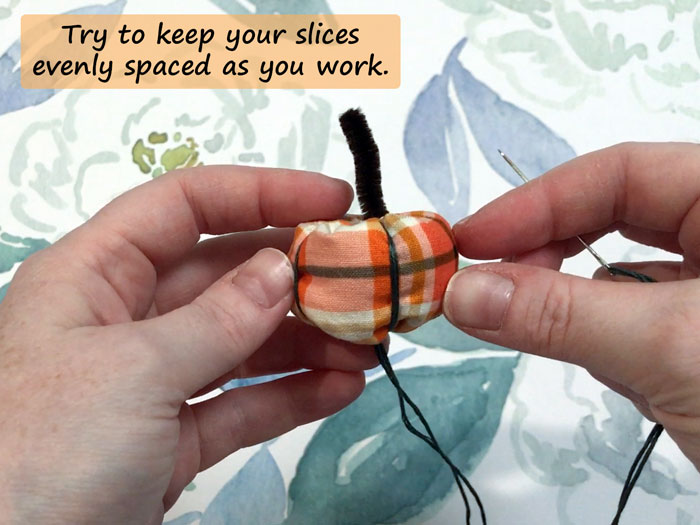
- Pull the floss tight to make an indention and create your first segment.
- Continue wrapping the floss around until you have 6-8 slices. I divided my pumpkin in half first, then into quarters, then in eighths.
- When you’re done, make a tiny stitch at the bottom and bring your needle back out the top.
- Tie a knot in the floss and snip it off.
- Use the blunt end of your needle to shove the knot back inside the pumpkin.


Our mini pumpkin is looking pretty fabulous! It just needs a leaf.
- Making the leaves is super simple. Just cut a small piece of green ribbon and sew it to the top of your pumpkin.

- Give your pumpkin’s stem a little bend, and you’re done!

These tiny fabric pumpkins are perfect for decorating your doll’s front porch and even make a cute centerpiece on the dining table!


I made an assortment of pumpkins by playing with the dimensions and using different types of stuffing (though most are filled with pom-poms).

In this picture, the small pumpkin is about 3/4″ tall (cut from a 2″ by 1″ strip of fabric) and has a pom-pom inside. The larger one is closer to 2″ tall and is stuffed with Polyfil.
Now go have fun sewing some pumpkins for your own dolls—or even yourself!

I’m not kidding–this is exactly how people-sized cloth pumpkins are made. I just shrunk the measurements and switched out a few of the supplies (such as chenille stems instead of real twigs or cinnamon sticks).

Be sure to tag me on Instagram if you do make these mini pumpkins (@pixie.dust.dolls). I’d love to see your take on them!

It’s so nice to get crafts done. 🙂 Your pumpkins look so cute.
Thanks! Yes, I’m super excited to finally have some time to craft😁. Hopefully, I can work on more this week–just need to decide which ones🤔.
That was fun to watch. I never knew that pumpkins could be so stylish.
Thanks! I’m glad you like them😁!
Your pumpkins turned out great! I’m lovin’ that red and black checked shirt too:@)
Thank you! Yes, that shirt is super cute. Right now, I’m all into checked patterns—they’re so cozy looking!